Sunday, August 31, 2014

Winnie & Walter Share the Love Week - Day 1 card

It's Share the Love week on the Winnie & Walter blog - and this week features Simon Say Stamp! The Day 1 Challenge is to use a Rainbow Color Palette.


I have only a few W&W and SSS products so I was really challenged to incorporate those into this week's challenges. (This is an excuse for me to buy more from both companies!)

I went with a one layer card and this card is my 2nd attempt - I didn't mask off the sentiment the first time and it was just too busy for my taste.


I am also submitting this to Simon Says Stamp's Work it Wednesday challenge.


Thanks for checking out my card!

Ingredients: Winnie & Walter Scenery: Big Bang Confetti; SSS Envelope Sentiments

Wreath Holiday card for Merry Monday

I had time this week to participate in the Merry Monday Challenge #123 - Use a Wreath on your card.


I adore WPlus9's Woodland Wreaths and wanted to take a more untraditional approach (for me anyway) to my holiday card. I decided to use a non-traditional color scheme - bright pink and turquoise with bright green.

Here is my card:


I used an impression plate to create a touch of texture on the card front as well as spraying it with Calico Shine to create some shimmer. The little felt bow was a little challenging to assemble but is super cute!

Here is a close up:


Thanks for checking out my card!

Ingredients: WPlus9 Woodland Wreaths; Mama Elephant Creative Cuts Dainty Bow; MFT Layered Treat Tag Die-namics (banner); PTI Linen/Canvas Impression Plate, Raspberry Fizz felt

Sunday, August 24, 2014

PTI Stamp-A-Faire - Time after Time Challenge

PTI's last challenge for the night (and the only other one I had time to do) was the Time after Time challenge (now don't we all have that song in our head?).

I found a card from 2008 - which was about 2 years into my card making (I was just starting to venture out from holiday cards) - to makeover.

Here it is:


This was a birthday card for my hubby using Lizzie Anne Stamps for a contest they were having. (I couldn't find any PTI stamped cards that were this old.) I cringe that this card 1. uses eyelets and 2. the blue panel is not popped up on foam tape! The party hat and gifts die cuts are from a Cuttlebug die (this was before all the companies jumped on the die wagon).  The orange is soooooo bright I need sunglasses! LOL

OK so here is my makeover of this card:


I wanted to keep the color orange somehow, so I used that for one of the die cut words. I had some Basic Grey paper that was similar to the birthday pattern paper in my original card so I made the tag from that.  To mimic the circle pattern paper on my original card, I stamped a background of circles on the remake. The tag represents the blue panel from the original. I stamped the candles in blue to pull that color in from the original.

Thanks for checking out my card!

Ingredients: PTI Tipped Tops, Tag Sale #3, Birthday Style, Wonderful Words: Birthday; Scrapblocks Distressed Circles; Basic Grey Life of the Party pattern paper

Saturday, August 23, 2014

PTI Stamp-a-Faire Morning Timer Challenge

It's Papertrey Ink's Stamp-A-Faire Day! I plan on participating in some of the challenges in between getting my son ready for move-in day tomorrow at college (EEK!) - and I'm starting off with the Morning Timer Challenge.


Here is my color and sketch combo:


I like this combo because it's gender neutral. I don't have some of these PTI colors but I used ones in my stash that were close. I had to do this card twice because I didn't overlap my images to have enough room for 5 images. This card came together pretty quickly - more like 10 minutes for me but only because I had to re-do my card.  I added the enamel dots because I got a tiny smudge of black in where the lime green dot is.

Here's my card:


Thanks for visiting! Happy stamping!

Ingredients: PTI Dot Spot, Wet Paint; Doodlebug Sprinkles (Fall); misc (black) enamel dot

Friday, August 22, 2014

Too Cute to Spook card for Make it Monday

PTI's Make it Monday #177 was hosted by the talented Laurie Willison this week. She showed us an awesome trick to use the negatives from the cover plates using none other than Glad Press n Seal!!! I was floored. Genius idea!

I just got my PTI order and decided to make a Halloween card with my new goodies.


I love seeing what Heather Nichols creates every year for Halloween and this year did not disappoint! The images are SUPER cute and the font for the sentiments is awesome!!! See wows me every year!

Here are some detail shots of my card:


I used embossing paste topped with silver embossing powder to create the stars on my card.


I covered the pumpkin with Wink of Stella because Halloween has to have some sparkle!

Here is the inside of my card:


I could only fit 2 chevrons on the front so I added another on the inside of my card to tie it together.

Thanks for checking out my card!

Ingredients: PTI Happy Spooky Halloween, Spider Web Trio; Chevron Vertical Cover Plate, Fillable Frames #1; Studio Calico Star Pattern Wonderland Mask/Stencil

Sunday, August 17, 2014

Smile card for MIM #176 - Embossing Paste Backgrounds

I heart Laura Bassen! This week's Make it Monday #176 for PTI was her first MIM video and of course she slammed it out of the park! I LOVE this technique, but I think I used too much embossing paste - I don't want to run out since my next order of supplies may be a couple of months from now (dang budgeting). Anyways, I could not wait to try this technique out! I knew I was going to use my Chevron Vertical cover plate right away for this (ok mostly cause I only own 1 PTI cover plate! LOL). I was also inspired by this card by Jen Shears who linked her card up. I loved the pop of the colored paste on kraft and knew I wanted to do that too!!!! I was not disappointed. Thanks Jen for the amazing inspiration!!!
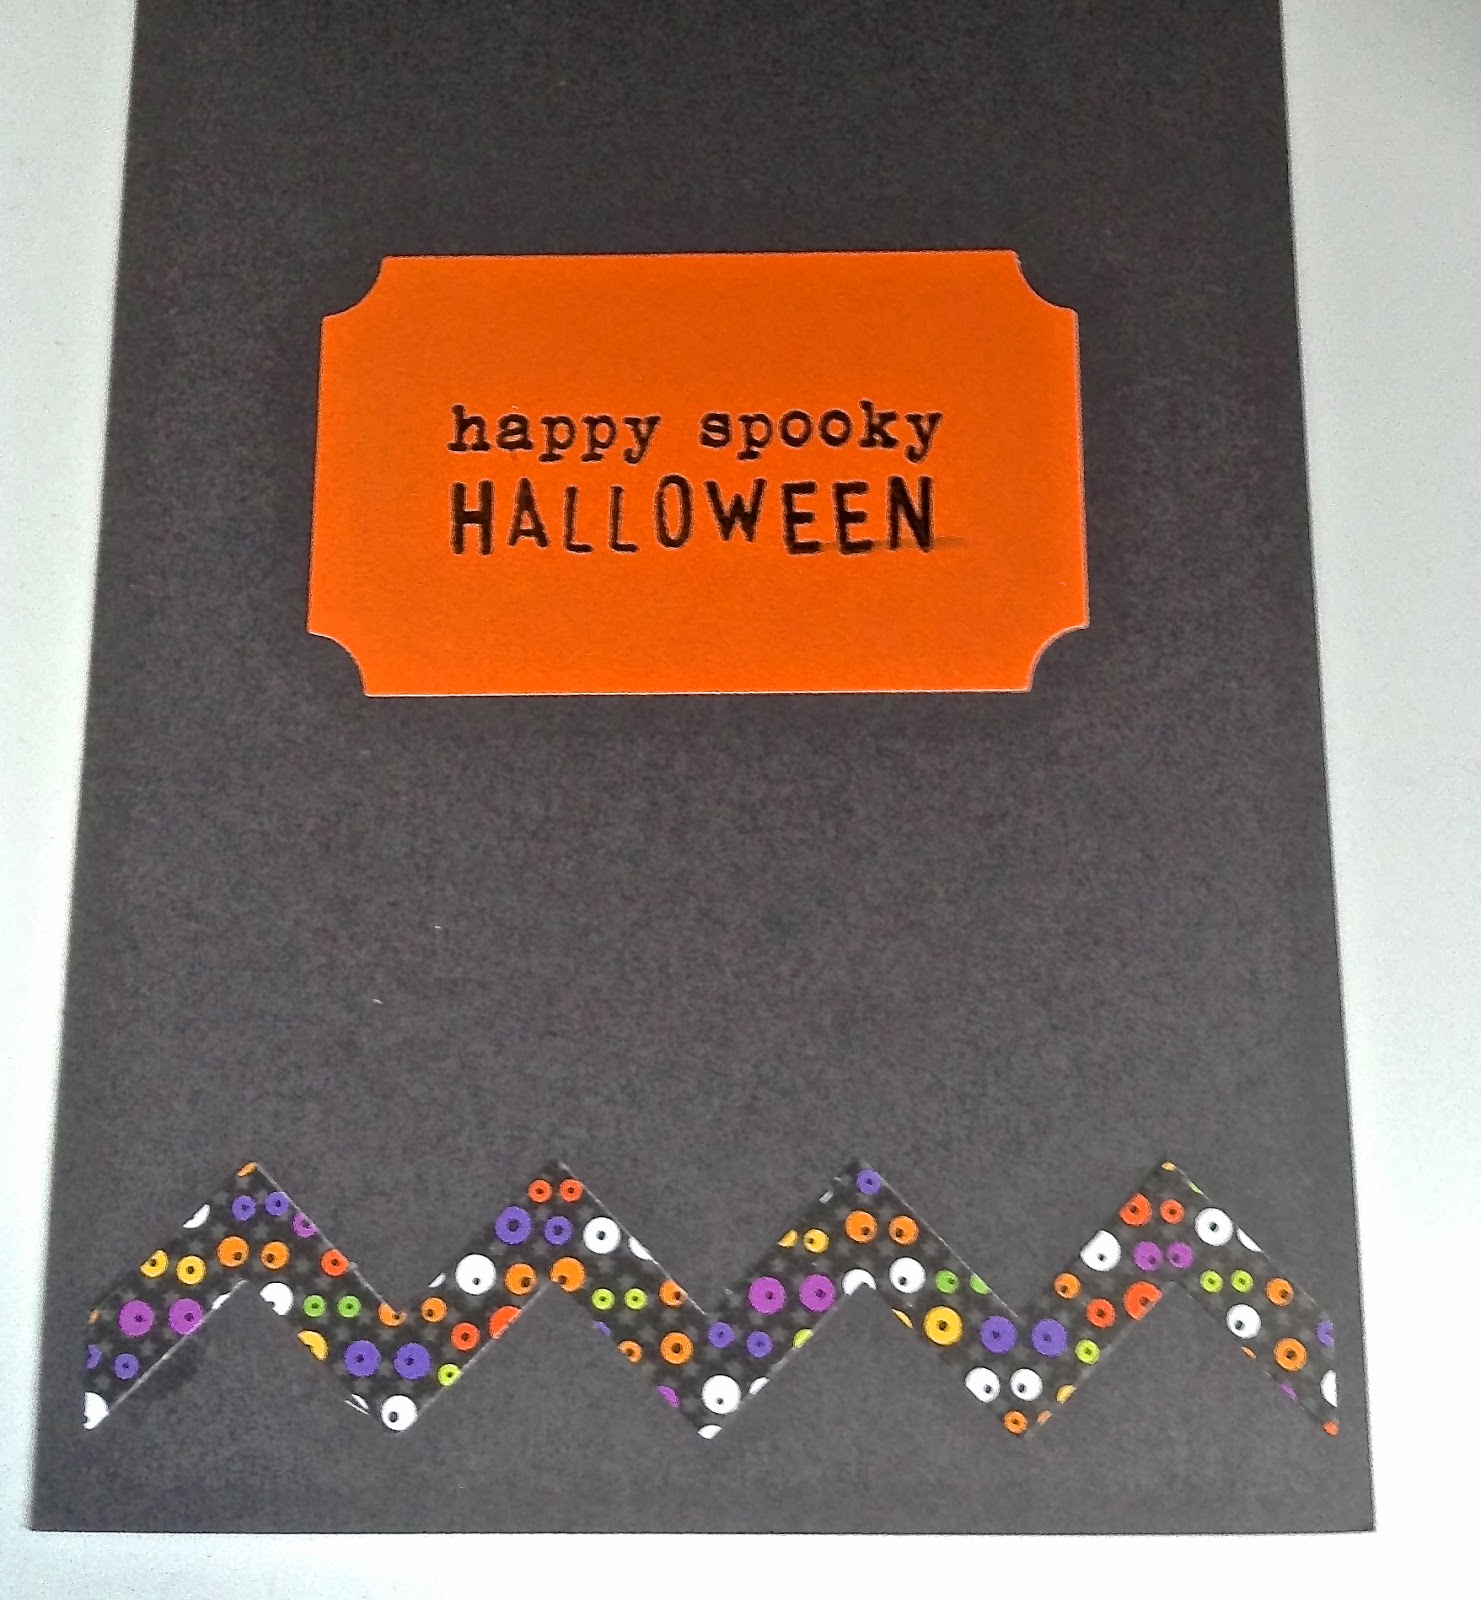
Here's my card:


I do not have re-inkers, so I ended up using my new mini Distress Inks (Picked Raspberry, Seedless Preserves and Peacock Feathers - I am loving this color combo lately!) to color the paste.

I put some twine behind the vellum die cut - I love that thread look but can't get it to work for me - the twine naturally went into a circle position so it worked and I adhered it with Glossy Accents in a few spots.

I really love this card - I'd love to give it to myself!!! I may hoard for a while!!

Thanks for checking out my card.

Ingredients: PTI Chevron Vertical Cover Plate, Happy die, Signature Greetings, twine

Saturday, August 16, 2014

Last Day of SYS2 Class - Day 11 card

Day 11 was play day in the Stretch Your Stamps 2 class. A smaller stamp set was used for a variety of techniques. I just got a few stamp sets from Sweet Stamp Shop and was determined to use one of them for class. I decide to make a card using the Custom Sentiment technique Laura showed us. I did not incorporate the repeating background technique for this card - I had a specific layout in mind.

Here's my card:


The sentiment is created from 3 different stamp sets - only 2 I had to mask off. I should have taken a close up because I put Wink of Stella on the girl hedgehog's bow, the 2 kraft hearts and inside the 2 hearts surrounding the sentiment. I colored my hedgies with my Bic Mark-It markers.

I really enjoyed this class - I have a ton of new techniques to add to my arsenal - OCC never disappoints! I also have a lot of cards made for my stash - I think I'll make some into card sets to give away. 

The teachers were awesome - some of which were new to me - and they all knocked it out of the park!!!

Thanks for checking out my card!!

Ingredients: Sweet Stamp Shop Hedgehog Kiss (including word "Smooches" which was masked, Koala (word "Let's (Hang)"); WPlus9 Love You More (word "Sweetheart"); MFT Transformables Heart Full of Love, Staggered Heart Border

Day 10 card for SYS2

Day 10's class gave us more floral and floral building stamp techniques. For my card, I used the DIY Stamped Letter Embellishments technique with regular floral stamps. I LOVED Laurie's card!!!! Great layout for a card set! I only have one set of alphabet dies and they are kind of small so I used the "Happy Birthday" dies from MFT to create my sentiment.


The word "birthday" was too long to go horizontally so I went vertical and I like how it came out.  I had a little boo-boo in the lower right corner - I used white Enamel Accents for my DIY enamel dots but the larger one I made had an air bubble so I scraped it up and in doing so was unable to put more Enamel Accents down because the card stock surface was damaged and the edges of the "dot" were not smooth. UGH. So I pulled out real enamel dots (and I don't have any while dots) so I used an couple of orange ones. I still have a little smudge of EA but I'll try to let it cure and see if I can scrape it up more.

Thanks for checking out my card!

Ingredients: Paper Smooches Botanicals 2; MFT Happy Birthday Die-Namics, Blueprints 11 (Panel); PTI Linen/Canvas Impression plate

Day 9 card for SYS2

Day 9 of OCC's Stretch Your Stamps 2 class was all about floral and floral builder stamps. I used the Stamping on Dark Cardstock with regular floral stamps technique that Yana demonstrated. I pretty much CASE'd her card. Here it is:


I've always wanted to try stamping dye ink over pigment ink - I must try this technique again - it's great for one layer cards.

Thanks for checking out my card!

Ingredients: Paper Smooches Botanicals 2; WPlus9 Fresh Cut Florals (sentiment); PTI Mat Stack Layerz #4

Friday, August 15, 2014

Card #2 for Day 8 of Stretch Your Stamps 2

Finally getting a chance to post my 2nd card for Day 8 (I'm behind in class but hope to catch up over the weekend).  For my card, I used Nichol Magouirk's Window Card technique using graphic stamps. Here's my card:


Here's a detail shot of the cut out chevron:


The little black dots are Ranger Enamel Accents. I've been making quite a few masculine one layer cards in class - I intend on sending them to my son when he goes off to college.

Until this class, I haven't been using the Autumn Pattern Pieces stamp set and here I am making several cards - I just needed the inspiration and some direction! Love that about the OCC classes!

Thanks for checking out my card!

Ingredients: PTI Autumn Pattern Pieces, Star Prints (sentiment)

Wednesday, August 13, 2014

Card for Day 8 of Stretch Your Stamps 2 class

Day 8 of SYS2 had lots of fun techniques - here is my take on one of them - Kristina's Ombre Repeat Stamping. My card isn't very ombre unfortunately! I was going from memory when I made it and forgot the ombre element - UGH!


I did emboss the sentiment - the black detail embossing powder really lets the sentiment (made with alphabet stamps) really stand out.

Thanks for checking out my card!

Ingredients: PTI Autumn Pattern Pieces; Kaiser Craft Distressed Alphabet

Tuesday, August 12, 2014

Card #2 for Day 7 of Stretch Your Stamps 2 classes

Here is my 2nd card for Day 7 - I used Debby's Creating Random Patterns technique.  It took me a few tests to get my "random" pattern set, but I really like how it came out in the end.


I accented the card with pumice distress stickles and white and black enamel accents.

Thanks for checking out my card!

Ingredients: PTI Autumn Pattern Pieces; Avery Elle Circle It

Card #1 for Day 7 of Stretch Your Stamps 2

Here is card #1 for Day 7 - it uses Laura Bassen's Form a Shape technique with a graphic stamp. I ended up using PTI's Autumn Pattern Pieces to do the technique. I've had this set for a while but haven't successfully used it - until NOW! My card is more like Laura's 2nd card but I alternated the colors.  I was pleased about how cute it came out!


Sorry for the lighting - I got home late and it's been rainy today so the lighting stinks. I really need to make a light box!!

Thanks for checking out my card!

Ingredients: PTI Autumn Pattern Pieces; Paper Smooches Sentiment Sampler

Monday, August 11, 2014

Combo technique card for SYS2 Bonus Day

I love "color me" type stamps - Paper Smooches, Lawn Fawn, Sweet Stamp Shop, PTI - all have cute sets to color! BUT this challenge threw me a bit. I don't have lots of "scene" pieces so I got stuck figuring out what to do with the Watercolor Spotlight technique Debby showed us on Bonus Day of OCC Stretch Your Stamps 2. I finally found a set to work with AND decided to all incorporate the Mirror Stamping technique Stephanie showed us as well in the same card.

I almost tossed this card - I wasn't entirely happy with the tree but went with it and like the more artsy feel the watercoloring created.

Here it is:


I did the mirror stamping of the squirrel image - the one on the left is the original way the squirrel faces/stamps. I had a hard time getting the mirrored imaged stamped cleanly - I think I stamped that squirrel a dozen times! I almost gave up and then I decide to take the cleanest image and trace the outline with a Glaze pen and was ok with it, then I watercolored both squirrels and the little apple.
BTW - the stamp set I used is called Spring Groves - yet here I used it in a fall capacity and it works - now that's stretching stamps!

Thanks for checking out my card!

Ingredients: Paper Smooches Spring Groves, Falling for You (apple); PTI cloud, Fillable Frames #7

Sunday, August 10, 2014

Another Day 6 card for SYS2!

Today's card features Donna Mikasa's Water Painting technique with outline stamps. The Distress Inks I used here are Picked Raspberry, Seedless Preserves and Peacock Feathers.  I also went with silver instead of gold and the dots are splotches from SC Mr. Huey's Mist in Silver but they came out kind of dark - even with some Wink of Stella on them.


Thanks for checking out my card!
P.S. I am just about caught up on Week #1 - I am working on 1 or 2 Bonus Day projects but I've hit some snags :)

Ingredients: PTI Friends Til the End; Winnie & Walter The Big, the Bold and the Happy

Day 4 Card for SYS2!

I have a card for Day 4 featuring Kelly Marie Alvarez' Letters as Objects technique for alphabet stamps. It took me a couple of days to come up with a concept but once I did I jumped in! Sometimes when I'm stuck on how to interpret what the teachers show us, I scan the student gallery for inspiration and to see how others interpreted the technique. I recall seeing someone that spelled out a sentiment so things clicked for me after seeing that! I love how we inspire each other!

I went for a halloween card this time, enjoy:


I tried to get a detail shot showing the Calico Shine I spritzed the card panel with - you can see it a bit on the bat to the left:


Thanks for checking out my card!

Ingredients: PTI Fresh Alphabet; Paper Smooches Crystal Clear, Halloweenie, Spookalicious (smaller bat), Shadows

Day 3 Card for Stretch Your Stamps 2!

Back again with more cards for class - whew what a busy crafty weekend! Today's card featured Julie Ebersole's Word Search technique with alphabet stamps. I made a fun card for my hubby.


I did add some sparkle with a little bit of Wink of Stella clear on the hearts.

Thanks for checking out my card!

Ingredients: PTI Fresh Alphabet; MFT Blueprints #11 (tiny hearts); WPlus9 Seasonal Sentiments (medium size heart)

More Day 6 SYS2 goodies!

Day 6 of OCC's Stretch Your Stamps 2 class was full of awesomeness! I adore Laura Bassen - she demonstrated an Over the Edge technique with tags -- CUTE idea! I created 2 tags displaying both techniques.


Thanks for checking out my tags. I'm still catching up in class so expect to see more soon!

Ingredients: PTI Friends Till the End, Tag Sale die #5, Mixed Messages

Day 6 card for SYS2!

Back with another card for OCC's Stretch Your Stamps 2 class - today's card features Debby Hughes' technique for Soft Stamping on Non-Paper!!! LOVE it! I adore Debby's style and techniques - she is for sure in my top 5 crafty gals list! Anyway as soon as I watched this I knew that I was going to use my new cork sheets from DCWV. The cork is pretty thin and very easy to die cut.

Here's my take on Debby's fab card and technique:


I used a tag die that has a border but it doesn't show well on the cork - I'm guessing it's too soft to keep the impression. I don't have Copic markers but I have a few Distress Markers and my Bic Mark-It markers so I used the Bic's to color the petals of the flower and my Crushed Olive Distress marker for the flower center. It blended quite nicely with little effort.

Here's detail shot:


I must try this technique again!!

Ingredients: PTI Friends Till the End, Tag Sale Die #3, Wonderful Words: Thank you, twine; Doodlebug Kraft in Color pattern papers

Day 5 card for SYS2!

I'm back again with another card for OCC's Stretch Your Stamps 2 class - this time I used Jennifer Rzasa's Easy Watercolor Outline & Debossing technique which features outline stamps. My outline stamp is PTI's Friends till the End - it's really the only fine line/artsy stamp set I have and it's also my most used/love stamp set! Anyway's here's my take on the technique:


Here are some detail shots:


I was sightly off when I stamped into the debossed area - my stamp is so well loved that it isn't completely clear anymore!

Thanks for checking out my card!

Ingredients: PTI Friends Till the End, Fabulous Frames, Tipped Tops

Saturday, August 9, 2014

Card #2 for Day 3 of Stretch Your Stamps 2!

OK on to my next card for Day 3 of OCC's SYS2 class. This card utilizes Stephanie's Word Art Stenciling technique with sentiment stamps. OH how I heart this technique! I don't have any "scene" type stencils but I had recently made my own stencil using transparency and my Avery Elle Balloons dies so I used that.

Here's my card:


I love one layer cards that have fun techniques! Notice that stray turquoise balloon in the upper right corner? When I was shading my large balloon I missed protecting the corner and smudged ink in the corner, when I discovered my boo-boo I stenciled a naked (sans text) balloon to cover it up!

Thanks for checking out my card!

Ingredients: Winnie & Walter The Big, the Bold & the Happy; Avery Elle Balloons dies and stamps

Card #1 for Day 3 of Stretch Your Stamps 2!

I have been busy making cards/tags for class - so much inspiration and so many fun techniques - some will have to wait for future use which is why I love these classes - lifelong techniques. Today my card features my alphabet stamps - I admit they don't much use unless I need to put a name on a card/tag but WOW was I blown away by Debby's Stamped Die Cuts technique! I knew instantly what to make - a Christmas card. And I LOVE IT!!!

Here is is:


I would have had this card posted earlier but I wanted to get a green distress ink for the tree, so I got more mini distress inks at Michael's yesterday (they only had #1 and #2 - side note: I was saddened by the variety of Tim Holtz goodies there -- and what they did have (minus the minis) were older items! no wonder I rarely go there when you can find everything online! end of side note).

Here is a detail shot:


I love the color combo I put together and LOVE the stars that were made with another technique that I think Debby showed in the Stenciled class  - putting embossing powered on top of embossing paste! Yes Please!

Thanks for checking out my card!

Ingredients: PTI Fresh Alphabet, In the Meadow dies - Silhouettes, Snow Drifts; Paper Smooches Christmas Words die; Studio Calico Star Pattern Wonderland Stencil/Mask

Thursday, August 7, 2014

Another Day 1 card for OCC Stretch Your Stamps 2 and for ME & Me!

I made another card featuring the Multi Layer Emboss Resist technique that Kristina showed us in class. The water colored panel didn't come out as clean as hers but I'm ok with it. My embossing seemed a little off too-maybe because of the design. I am also submitting this in the current Mama Elephant & Me August Challenge - Watercoloring + Birthdays.


Ok here's my card:


Here's a detail shot:


I bought some real water colors yesterday - they are Lukas Aquarell Studio - a travel size palette with 12 cubes of color (they are so cute!). I watercolored the panel and the balloons.

Thanks for checking out my card!

Ingredients: Mama Elephant Modern Borders, Good Times

Tuesday, August 5, 2014

Day 2 card for Stretch Your Stamps 2 class!

Time for my Day 2 card for OCC's Stretch Your Stamps 2 class. This time I CASE'd Laura Sterckx fab ombre card! I was blown away that she's only 16 - she has awesome skills!!!  My original background stamp I chose prior to class starting was Hero Art's Newspaper background stamp BUT when I watched the Day 1 videos I knew it would not do for these techniques SO I searched through my stamps and found a border stamp from Mama Elephant that I could use. Let me say that repeatedly stamping a border stamp in Versamark is not easy on the eyes but I digress!

Here's my card:


 (Sorry for the lighting - dusk was setting in!)

I loved that thread thing Laura did behind the sentiment and have seen others use, but I have not gotten the hang of that so I went with a doily die to create a similar look.

Thanks for checking out my card! PS - I'll be creating another card for Day1 later this week - I need to hunt down some real water color paints to finish my card.

Ingredients: Mama Elephant Modern Borders; Paper Smooches Sentiment Sampler, Word Bubbles die; MFT Delicate Doilies 

Day 1 - Card for Stretch Your Stamps 2!

Yeah OCC's Stretch Your Stamps 2 class has started! Background stamps were the most difficult ones for me to find in my stash - I don't have a lot that are large background stamps and very few with a reverse image. Today's card features a reverse image stamp and uses Shari Carroll's faux watercolor stamping technique. While I love her tile technique - I stink at lining up shapes SO I  decided to do a pared down version of the tiles. I was inspired to create a halloween card based on the distressed-ness (not a real word likely) of the stamped background image.

Here we go….


P.S. I MUST get more mini Distress Inks like NOW so I can have more range for these water coloring techniques that I am loving right now! Shopping trip time!

Here is a detail shot of so you can see the glitteryness from my Wink of Stella pen…


Thanks for checking out my card!

Ingredients: PTI Boo to You (halloween word), Happy Haunting (ghost die, ghost eyes), One Liners: Happy; Misc Gems

Friday, August 1, 2014

A couple of cards….

I have a couple of cards that I made lately that hadn't gotten posted and were not being submitted in any challenges. Both of these cards use stamps and dies that I hadn't used yet (yeah!).

The first card is a Get Well card I made for my co-worker:


Ingredients: Paper Smooches Woofers & Tweeters, Sentiment Sampler; Hero Arts Word Bubbles; PTI Grid Card stock

The next is the graduation card I made for my son:

Ingredients: Lawn Fawn Hats Off; MFT Gift Card Greetings II, Blueprints #11

Thanks for stopping by!